> ## Documentation Index
> Fetch the complete documentation index at: https://dripart-matt-router-pricing-pika-and-guard.mintlify.site/llms.txt
> Use this file to discover all available pages before exploring further.
# ComfyUI-Manager 설치
> Desktop, 휴대용 또는 수동 설치 ComfyUI에 ComfyUI-Manager를 설치하여 앱 내부에서 커스텀 노드를 검색, 설치, 업데이트하세요.
## 데스크톱 사용자
Comfy 데스크톱은 모든 ComfyUI 설치에 ComfyUI-Manager를 함께 설치하고 `--enable-manager`로 시작하므로, 별도로 설치할 것이 없습니다. 매니저는 앱 안에서 설치별로 구성합니다:
Comfy 데스크톱에서 해당 설치를 열고 **Manage panel**로 이동한 다음, **Startup Args** 탭으로 전환합니다.
* **Manager Security Level**은 매니저가 설치할 수 있는 노드 팩을 결정합니다: **Strict**, **Standard**(권장), **Relaxed**, **Permissive**. `--listen`으로 ComfyUI를 네트워크에 노출할 때는 더 엄격한 수준이 특히 중요합니다
* **Manager Network Mode**는 매니저가 노드 레지스트리에 접근하는 방식을 결정합니다: **Public**(기본값), **Private**, **Offline**, **Personal cloud** (본인이 관리하는 머신에서만 사용하세요)
두 옵션 모두 다음에 해당 설치를 실행할 때 적용됩니다.
같은 탭의 **Startup Arguments**는 해당 설치가 실행될 때 사용하는 플래그를 제어합니다. 매니저 없이 ComfyUI를 실행하려면 `--enable-manager`를 제거하고, 매니저 UI는 숨기되 배경 작업은 계속 실행하려면 그대로 두고 `--disable-manager-ui`를 추가합니다.
설치별 나머지 설정은 [Startup Args 탭](/ko/installation/desktop/usage/manage#시작-인자-탭)을, 매니저 플래그는 [시작 플래그 레퍼런스](/ko/development/comfyui-server/startup-flags)를 참고하세요.
## 휴대용 사용자
[Windows 휴대용](/ko/installation/comfyui_portable_windows) 버전을 실행하는 사용자의 경우, 새로운 ComfyUI-Manager가 ComfyUI 코어에 내장되어 있지만 이를 활성화해야 합니다.
1. 관리자 종속성 설치:
```bash theme={null}
.\python_embeded\python.exe -m pip install -r ComfyUI\manager_requirements.txt
```
2. 관리자가 활성화된 상태로 ComfyUI 실행:
```bash theme={null}
.\python_embeded\python.exe -s ComfyUI\main.py --windows-standalone-build --enable-manager
pause
```
## 수동 설치 사용자
[수동 설치](/ko/installation/manual_install)를 한 사용자의 경우, 새로운 ComfyUI-Manager가 ComfyUI 코어에 내장되어 있지만 이를 활성화해야 합니다.
1. 가상 환경 활성화:
```bash theme={null}
# Windows
venv\Scripts\activate
# Linux/macOS
source venv/bin/activate
```
2. 관리자 종속성 설치:
```bash theme={null}
pip install -r manager_requirements.txt
```
3. ComfyUI 실행 시 `--enable-manager` 플래그를 통해 관리자를 활성화:
```bash theme={null}
python main.py --enable-manager
```
### 명령줄 옵션
| 플래그 | 설명 |
| - | - |
| `--enable-manager` | ComfyUI-Manager 활성화 |
| `--enable-manager-legacy-ui` | 새 UI 대신 레거시 관리자 UI 사용 (필요조건: `--enable-manager`) |
| `--disable-manager-ui` | 백그라운드 기능은 유지하되 관리자 UI와 엔드포인트 비활성화 (필요조건: `--enable-manager`) |
### 새 UI와 레거시 UI 간 전환
다음 버전 업데이트는 pip 설치만 지원합니다. 커스텀 노드를 통해 설치한 버전은 새 UI로의 전환이 불가능합니다.
새 UI를 사용하려면:
```bash theme={null}
python main.py --enable-manager
```
레거시 UI를 사용하려면:
```bash theme={null}
python main.py --enable-manager --enable-manager-legacy-ui
```
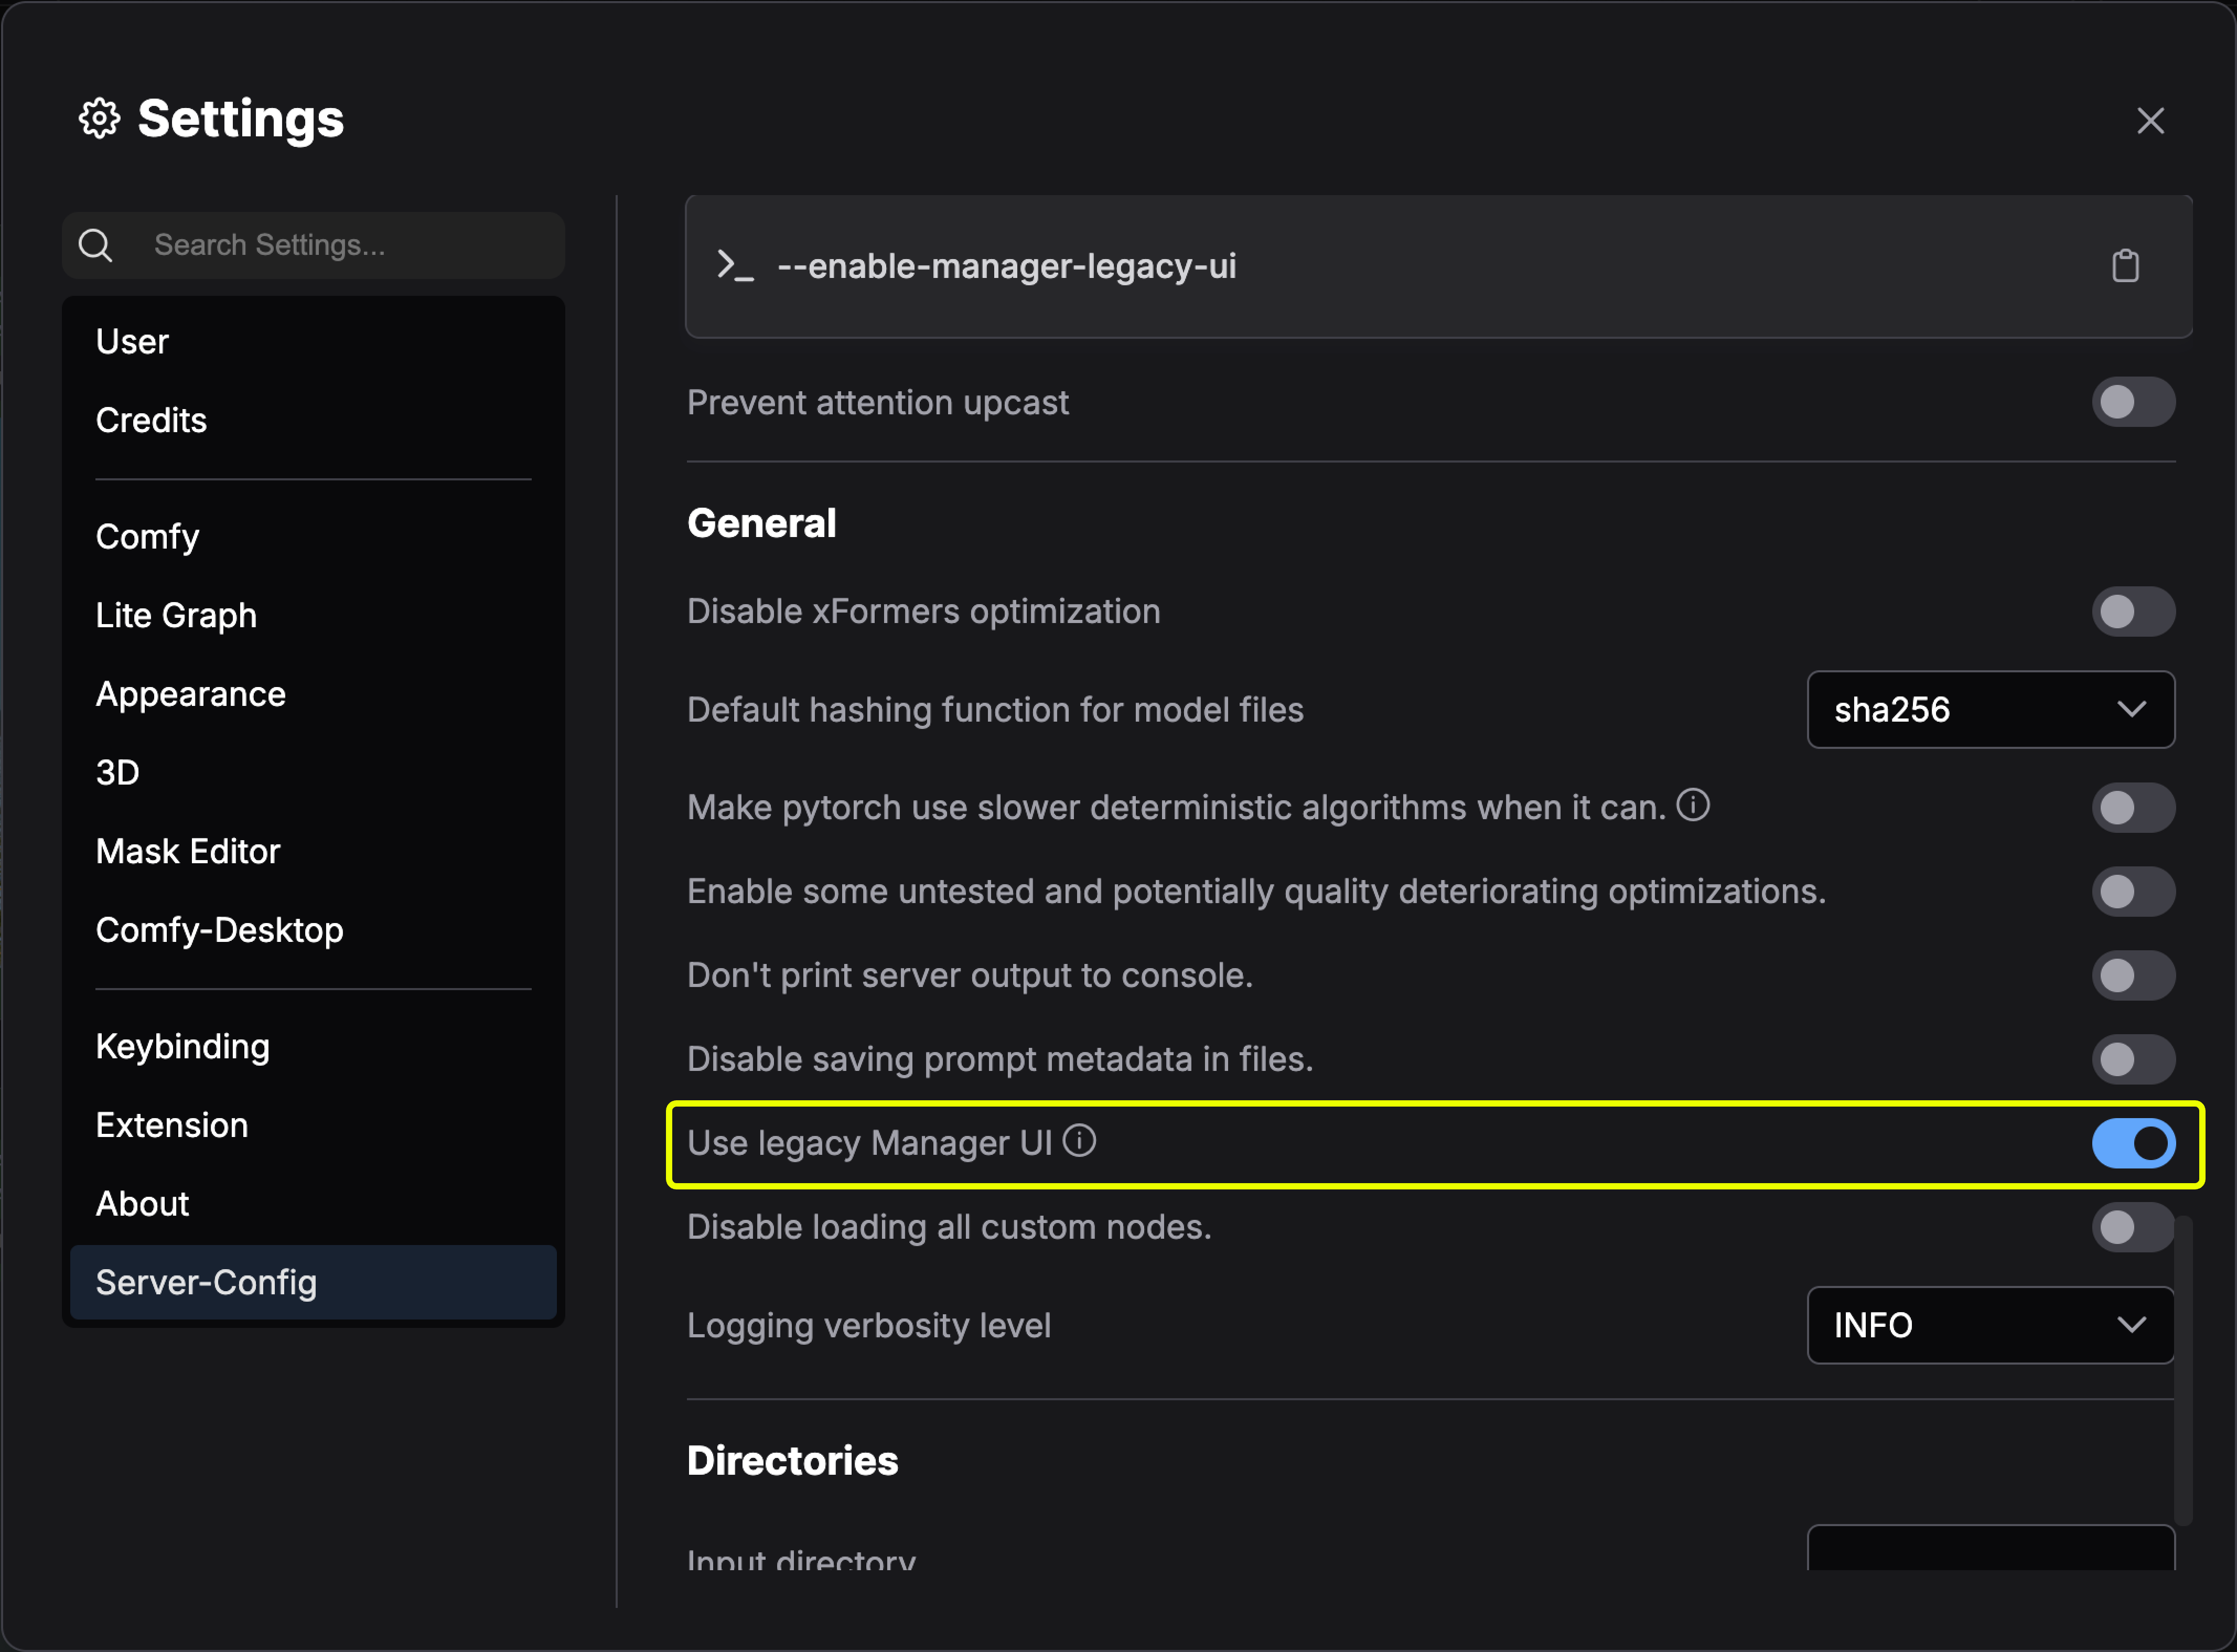
데스크톱 사용자는 **서버 설정 → UI 설정 → 레거시 관리자 인터페이스 사용**에서 레거시 UI로 전환할 수 있습니다.
 ## ComfyUI-Manager 업데이트
ComfyUI-Manager는 ComfyUI 본체와 별개의 Python 패키지이며, ComfyUI 본체는 대응하는 버전을 `manager_requirements.txt`에 고정합니다. 매니저 업데이트 방법은 ComfyUI 설치 방식에 따라 다릅니다:
데스크톱에는 매니저가 포함되어 있으며 Comfy Desktop 업데이트와 함께 최신 상태로 유지됩니다. [관리 패널](/ko/installation/desktop/usage/manage#업데이트-탭)에서 ComfyUI 엔진을 업데이트하세요.
ComfyUI를 업데이트해도 설치된 매니저 패키지는 업데이트되지 않을 수 있습니다. ComfyUI를 실행하는 환경에서 매니저 의존성을 설치한 뒤, `--enable-manager` 옵션으로 ComfyUI를 다시 시작하세요:
```bash theme={null}
# 포터블(Windows)
.\python_embeded\python.exe -m pip install -r ComfyUI\manager_requirements.txt
.\python_embeded\python.exe -s ComfyUI\main.py --windows-standalone-build --enable-manager
# 수동 설치
pip install -r manager_requirements.txt
python main.py --enable-manager
```
매니저를 직접 `custom_nodes`에 복제한 경우:
```bash theme={null}
cd ComfyUI/custom_nodes/comfyui-manager
git pull
```
그런 다음 ComfyUI를 재시작하세요.
## 레거시 설치 방법
기존 ComfyUI 설치에 ComfyUI-Manager를 추가로 설치하려면:
1. 터미널에서 `ComfyUI/custom_nodes` 디렉토리로 이동
2. 리포지토리 복제:
```bash theme={null}
git clone https://github.com/Comfy-Org/ComfyUI-Manager comfyui-manager
```
3. 관리자 종속성 설치:
```bash theme={null}
cd comfyui-manager
pip install -r requirements.txt
```
4. ComfyUI 재시작
1. [Git for Windows](https://git-scm.com/download/win) 설치 (독립형 버전, "윈도우 기본 콘솔 창 사용" 선택)
2. [install-manager-for-portable-version.bat](https://github.com/Comfy-Org/ComfyUI-Manager/raw/main/scripts/install-manager-for-portable-version.bat)를 `ComfyUI_windows_portable` 디렉토리에 다운로드
3. 배치 파일을 더블클릭해 설치
comfy-cli는 CLI에서 ComfyUI를 관리하는 다양한 기능을 제공합니다.
**사전 요구사항**: Python 3, Git
**Windows:**
```bash theme={null}
python -m venv venv
venv\Scripts\activate
pip install comfy-cli
comfy install
```
**Linux/macOS:**
```bash theme={null}
python -m venv venv
. venv/bin/activate
pip install comfy-cli
comfy install
```
참고: [comfy-cli 문서](/ko/comfy-cli/getting-started)
**사전 요구사항**: python-is-python3, python3-venv, git
1. [install-comfyui-venv-linux.sh](https://github.com/comfy-org/ComfyUI-Manager/raw/main/scripts/install-comfyui-venv-linux.sh)를 빈 설치 디렉토리에 다운로드
2. 실행:
```bash theme={null}
chmod +x install-comfyui-venv-linux.sh
./install-comfyui-venv-linux.sh
```
3. `./run_gpu.sh` 또는 `./run_cpu.sh`로 ComfyUI 실행
**설치 주의사항:**
* ComfyUI-Manager 파일은 반드시 `ComfyUI/custom_nodes/comfyui-manager` 경로에 정확히 위치해야 합니다.
* `ComfyUI/custom_nodes`에 직접 압축 해제하지 마세요 (예: `__init__.py` 같은 파일이 해당 디렉토리에 있으면 안 됩니다).
* `ComfyUI/custom_nodes/ComfyUI-Manager/ComfyUI-Manager` 또는 `ComfyUI/custom_nodes/ComfyUI-Manager-main`과 같은 경로에 설치하지 마세요.
This documentation is built and hosted on [Mintlify](https://mintlify.com), a developer documentation platform.
## ComfyUI-Manager 업데이트
ComfyUI-Manager는 ComfyUI 본체와 별개의 Python 패키지이며, ComfyUI 본체는 대응하는 버전을 `manager_requirements.txt`에 고정합니다. 매니저 업데이트 방법은 ComfyUI 설치 방식에 따라 다릅니다:
데스크톱에는 매니저가 포함되어 있으며 Comfy Desktop 업데이트와 함께 최신 상태로 유지됩니다. [관리 패널](/ko/installation/desktop/usage/manage#업데이트-탭)에서 ComfyUI 엔진을 업데이트하세요.
ComfyUI를 업데이트해도 설치된 매니저 패키지는 업데이트되지 않을 수 있습니다. ComfyUI를 실행하는 환경에서 매니저 의존성을 설치한 뒤, `--enable-manager` 옵션으로 ComfyUI를 다시 시작하세요:
```bash theme={null}
# 포터블(Windows)
.\python_embeded\python.exe -m pip install -r ComfyUI\manager_requirements.txt
.\python_embeded\python.exe -s ComfyUI\main.py --windows-standalone-build --enable-manager
# 수동 설치
pip install -r manager_requirements.txt
python main.py --enable-manager
```
매니저를 직접 `custom_nodes`에 복제한 경우:
```bash theme={null}
cd ComfyUI/custom_nodes/comfyui-manager
git pull
```
그런 다음 ComfyUI를 재시작하세요.
## 레거시 설치 방법
기존 ComfyUI 설치에 ComfyUI-Manager를 추가로 설치하려면:
1. 터미널에서 `ComfyUI/custom_nodes` 디렉토리로 이동
2. 리포지토리 복제:
```bash theme={null}
git clone https://github.com/Comfy-Org/ComfyUI-Manager comfyui-manager
```
3. 관리자 종속성 설치:
```bash theme={null}
cd comfyui-manager
pip install -r requirements.txt
```
4. ComfyUI 재시작
1. [Git for Windows](https://git-scm.com/download/win) 설치 (독립형 버전, "윈도우 기본 콘솔 창 사용" 선택)
2. [install-manager-for-portable-version.bat](https://github.com/Comfy-Org/ComfyUI-Manager/raw/main/scripts/install-manager-for-portable-version.bat)를 `ComfyUI_windows_portable` 디렉토리에 다운로드
3. 배치 파일을 더블클릭해 설치
comfy-cli는 CLI에서 ComfyUI를 관리하는 다양한 기능을 제공합니다.
**사전 요구사항**: Python 3, Git
**Windows:**
```bash theme={null}
python -m venv venv
venv\Scripts\activate
pip install comfy-cli
comfy install
```
**Linux/macOS:**
```bash theme={null}
python -m venv venv
. venv/bin/activate
pip install comfy-cli
comfy install
```
참고: [comfy-cli 문서](/ko/comfy-cli/getting-started)
**사전 요구사항**: python-is-python3, python3-venv, git
1. [install-comfyui-venv-linux.sh](https://github.com/comfy-org/ComfyUI-Manager/raw/main/scripts/install-comfyui-venv-linux.sh)를 빈 설치 디렉토리에 다운로드
2. 실행:
```bash theme={null}
chmod +x install-comfyui-venv-linux.sh
./install-comfyui-venv-linux.sh
```
3. `./run_gpu.sh` 또는 `./run_cpu.sh`로 ComfyUI 실행
**설치 주의사항:**
* ComfyUI-Manager 파일은 반드시 `ComfyUI/custom_nodes/comfyui-manager` 경로에 정확히 위치해야 합니다.
* `ComfyUI/custom_nodes`에 직접 압축 해제하지 마세요 (예: `__init__.py` 같은 파일이 해당 디렉토리에 있으면 안 됩니다).
* `ComfyUI/custom_nodes/ComfyUI-Manager/ComfyUI-Manager` 또는 `ComfyUI/custom_nodes/ComfyUI-Manager-main`과 같은 경로에 설치하지 마세요.
This documentation is built and hosted on [Mintlify](https://mintlify.com), a developer documentation platform.